


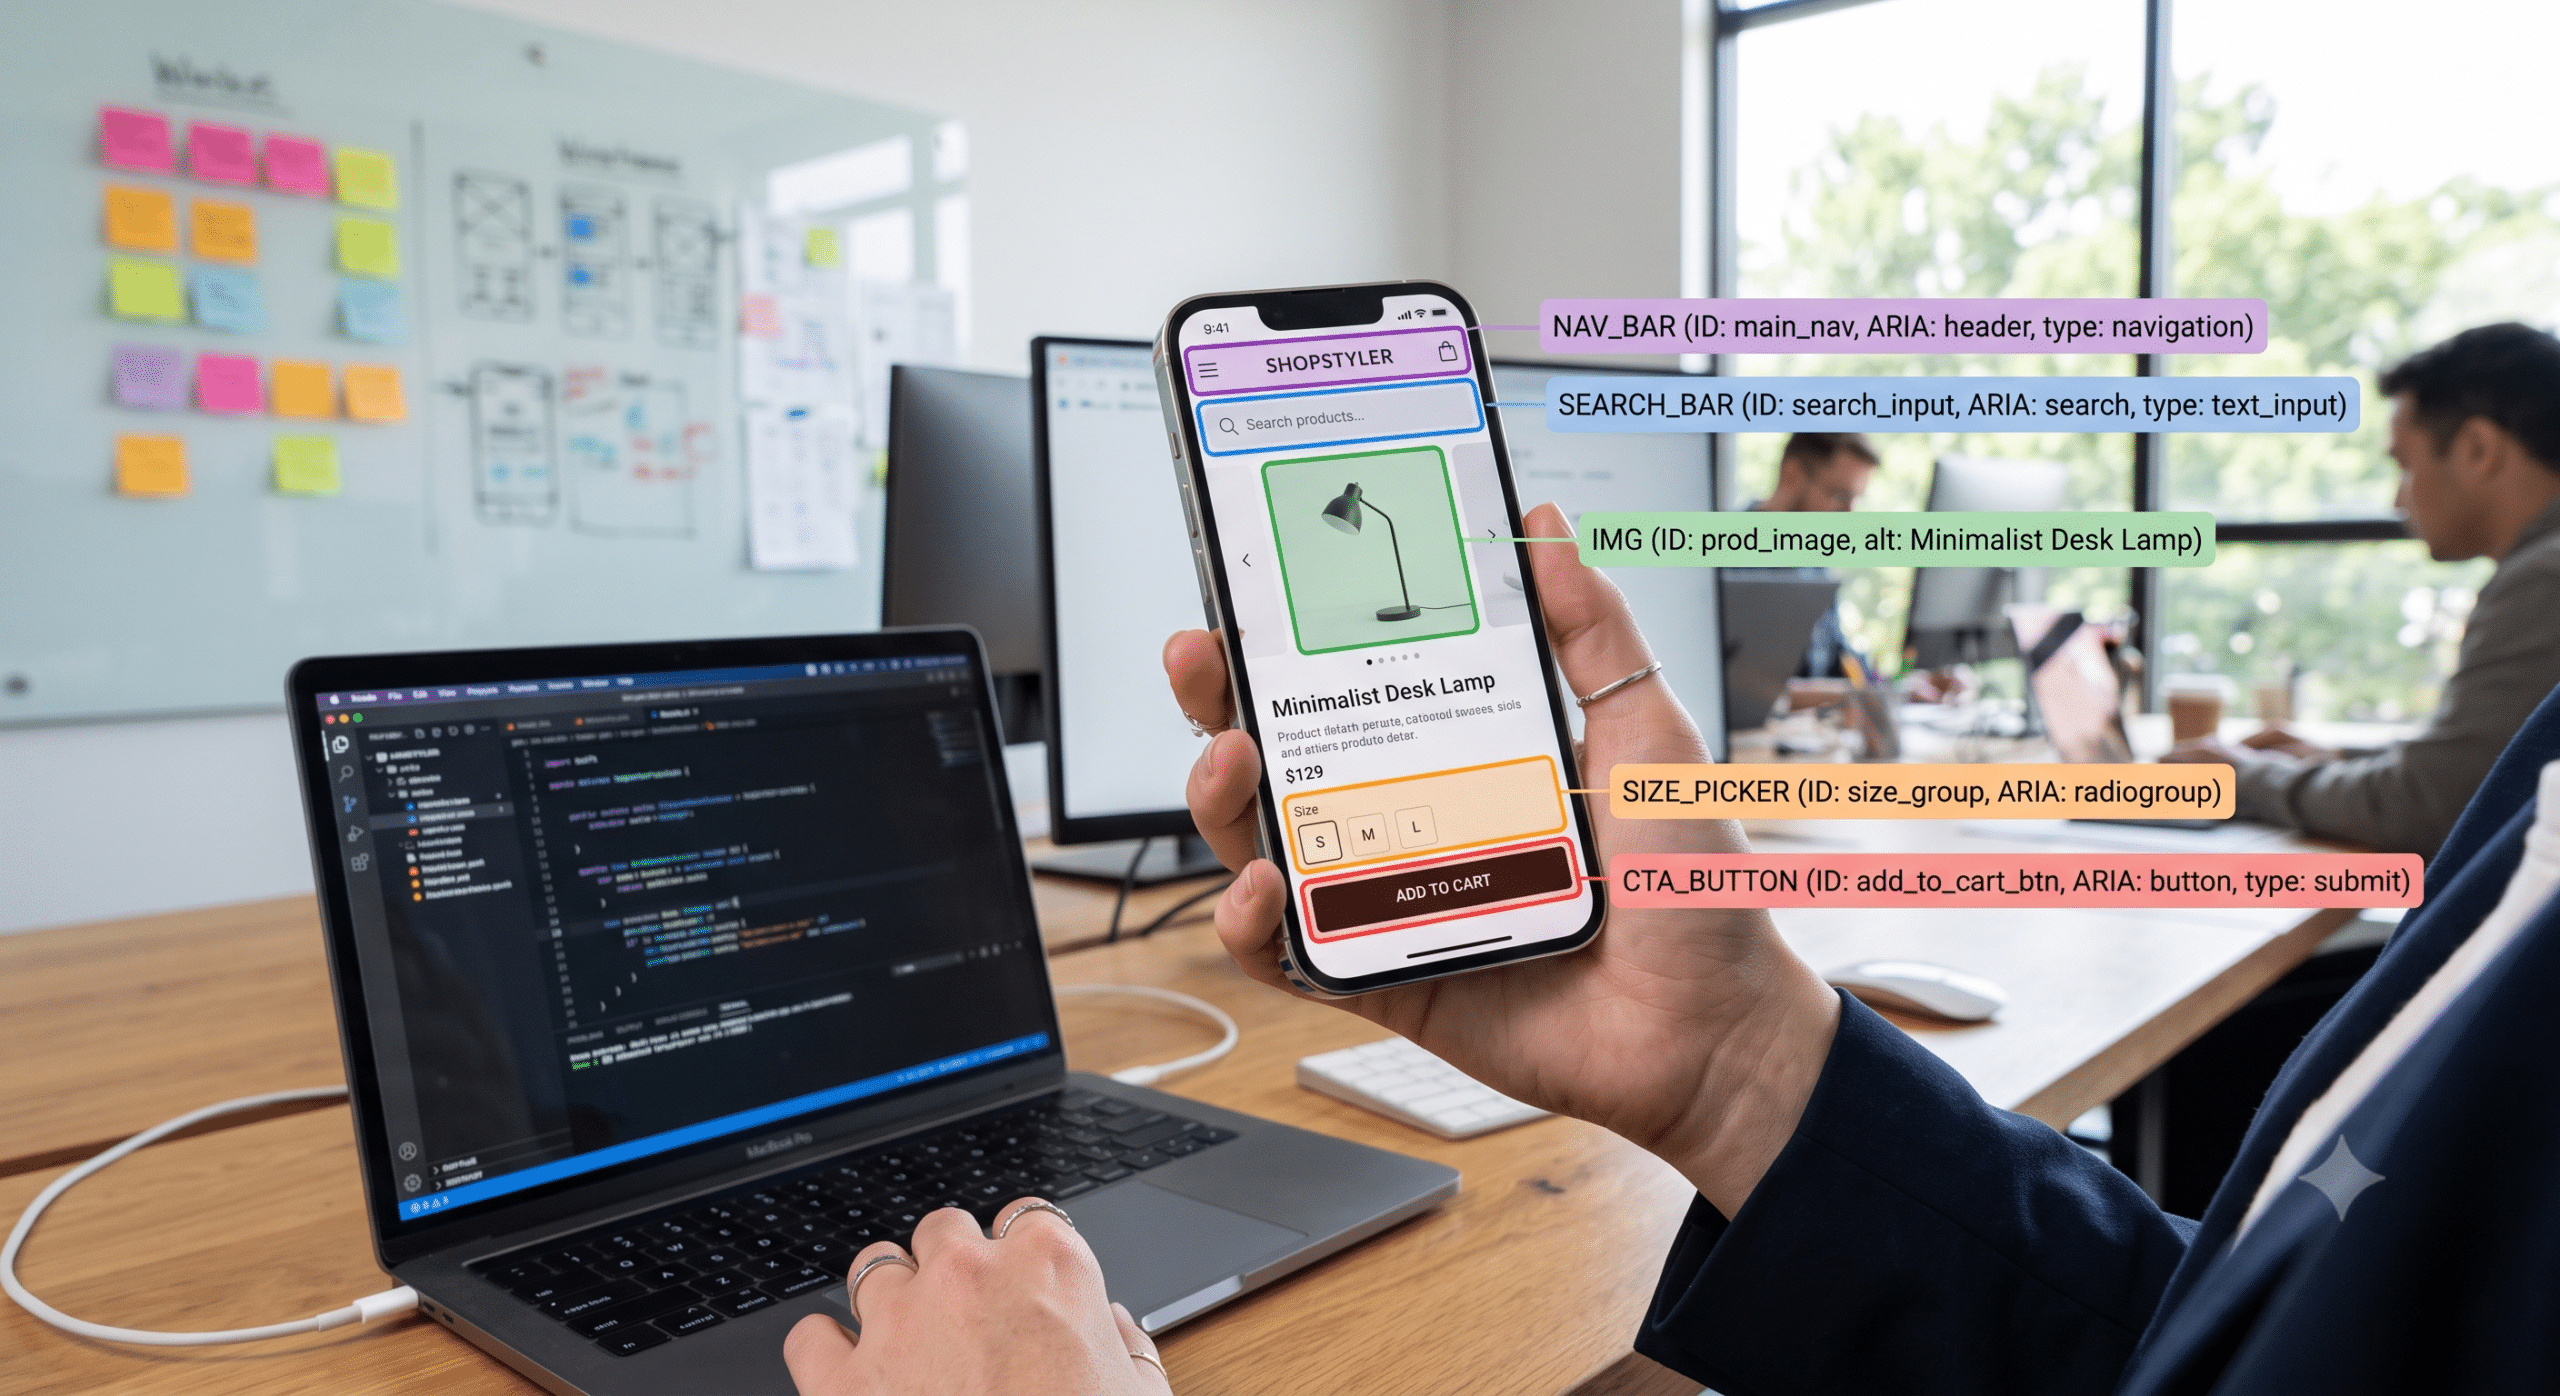
When designing modern mobile applications, prioritizing VoiceOver accessibility iOS ensures that your product is usable by everyone, regardless of visual ability. Today, people use mobile apps to shop, bank, learn, work, and stay connected. Because these applications are so vital to everyday life, every single user should be able to enjoy the exact same digital experience, including individuals living with disabilities.
Consequently, prioritizing this built-in screen reader framework is one of the most valuable moves a development team can make. VoiceOver helps people who are blind or have low vision navigate apps through spoken feedback and gestures. Therefore, when developers build apps with VoiceOver accessibility iOS in mind, they create experiences that are ultimately easier, faster, and more enjoyable for everyone.
In the past, accessibility was often treated as something developers simply added at the tail end of a project. However, establishing a solid foundation for VoiceOver accessibility iOS should actually be considered from the very beginning of the design and development process. Ultimately, a well-designed accessible app reaches a much wider audience, drastically improves customer satisfaction, and frequently performs better in app reviews simply because it is easier to use.
With this in mind, this guide will teach you exactly what VoiceOver accessibility iOS is, why it matters, and 11 practical best practices that help create mobile apps everyone can use.
What Is VoiceOver on iOS?
To put it simply, VoiceOver is Apple’s built-in screen reader available on every iPhone and iPad. Instead of relying on sight, it reads aloud the content displayed on the screen and allows users to navigate using touch gestures.
For example, when someone touches a button, VoiceOver instantly announces:
Button name
Button type
Current state
Helpful hints (if available)
Furthermore, instead of tapping once to activate a button, VoiceOver users must first select an item and then double-tap anywhere on the screen to open it. Because of this completely different navigation method, optimizing for VoiceOver accessibility iOS means developers must ensure that every screen is fully understandable without relying solely on visual elements.
Why VoiceOver Accessibility Matters
Globally, millions of people live with some level of vision loss. As a result, many depend on screen readers every single day to access websites, apps, emails, social media, and online services.
If an app does not support VoiceOver accessibility iOS correctly, users may struggle to:
Log into an account
Complete purchases
Read important information
Fill out forms
Navigate menus
Contact customer support
Inevitably, poor accessibility creates massive frustration and frequently causes users to uninstall an app altogether. On the other hand, properly implementing VoiceOver accessibility iOS provides significant benefits, such as:
A significantly better customer experience
Higher user satisfaction
Improved usability for everyone
Wider audience reach
Better compliance with global accessibility standards
A stronger brand reputation
In short, accessibility is truly about removing barriers, rather than just adding extra features.
How VoiceOver Works
Essentially, VoiceOver identifies every single accessible element on the screen. Specifically, these elements include:
Buttons
Images
Text labels
Menus
Text fields
Links
Switches
Sliders
Lists
Checkboxes
When users move through these elements, VoiceOver continuously announces helpful information. For instance, instead of simply saying:
Button
VoiceOver should ideally say:
Continue, Button
Or even better:
Continue to Checkout, Button
Ultimately, the more descriptive the label is, the easier it becomes for users to understand exactly what will happen next.
The Benefits of Building for VoiceOver
Interestingly, designing for accessibility often improves the experience for every user—not just those who are using assistive technology. In particular, the core benefits of focusing on VoiceOver accessibility iOS include:
Better Navigation: Because clear labels make interfaces much easier to understand.
Cleaner Design: In addition, accessibility naturally encourages simple layouts with logical organization.
Improved User Trust: As a result, people truly appreciate apps that are inclusive and thoughtful.
Better App Store Reviews: Consequently, users often explicitly mention accessibility improvements in positive reviews.
Easier Future Maintenance: Finally, apps built with accessibility from the beginning usually require far fewer redesigns later on.
11 Best Practices for VoiceOver Accessibility iOS
To help you get started, below are practical recommendations that developers can implement to build more accessible apps.
1. Give Every Interactive Element a Clear Accessibility Label
Without a doubt, one of the most common accessibility mistakes is leaving buttons completely without labels. Imagine a shopping app where the checkout button only displays an icon. Without a label, VoiceOver might simply announce:
Button
Obviously, that does not tell users anything useful. Instead, you should assign highly descriptive accessibility labels. Good examples include:
Add to Cart
View Profile
Open Settings
Save Changes
Submit Order
Meanwhile, you should completely avoid vague labels like:
Click Here
Button One
Image
In conclusion, clear labels drastically improve navigation and reduce confusion.
2. Use Helpful Accessibility Hints
Sometimes, a simple label just isn’t enough. In these cases, accessibility hints can explain exactly what will happen after activation.
For example:
Label: Delete File
Hint: Permanently removes this file.
Another example:
Label: Payment Options
Hint: Opens your saved payment methods.
However, hints should only provide extra information. Therefore, they should never simply repeat the label.
Bad example:
Label: Settings
Hint: Opens Settings
Instead, use:
Hint: Change notifications, privacy, and account preferences.
Ultimately, helpful hints reduce uncertainty and boost user confidence.
3. Write Meaningful Button Names
Unfortunately, many developers use symbols instead of actual words. For example:
❤️
👤
⚙️
🛒
While these icons may look obvious to sighted users, they mean very little when announced by a screen reader. For this reason, always pair icons with descriptive accessibility labels.
Instead of: Heart Button $\rightarrow$ Use: Add to Favorites
Instead of: Gear $\rightarrow$ Use: Open Settings
As a rule, simple wording makes navigation much easier.
4. Keep Navigation Order Logical
By default, VoiceOver moves through elements in a specific, linear order. If the reading order feels completely random, users will quickly become lost. Imagine a checkout page that reads out of order:
Payment $\rightarrow$ Header $\rightarrow$ Cancel $\rightarrow$ Shipping $\rightarrow$ Price $\rightarrow$ Continue
Clearly, this sequence makes very little sense. Instead, VoiceOver should strictly follow the same logical flow that users see visually:
Page Title
Shipping Address
Payment Method
Order Summary
Total Cost
Continue Button
In the end, a predictable reading order creates a much smoother user experience.
5. Describe Images That Matter
It is important to note that not every single image needs a description. For instance, purely decorative images can usually be ignored entirely by the screen reader. However, informative images should always include meaningful alternative descriptions.
For example:
Poor label: Image
Better label: Map showing the nearest store location.
Another example:
Instead of: Photo
Use: Profile picture of Sarah Johnson.
Above all, descriptions should explain the underlying purpose of the image rather than detailing every minor visual element.
6. Clearly Announce Form Errors
Undeniably, forms represent one of the biggest accessibility challenges in mobile design. Suppose someone enters an incorrect email address. In this scenario, showing a red border alone is simply not enough. Instead, VoiceOver users should immediately hear:
Email address is invalid. Please enter a valid email.
Similarly, password requirements should be announced very clearly:
Password must contain at least eight characters.
Passwords do not match.
Phone number is required.
Ultimately, clear error messages help users fix problems immediately without having to guess.
7. Support Dynamic Text Sizes
Many users routinely increase their text size within their global iOS settings. Therefore, apps should always respect these preferences instead of forcing tiny, rigid fonts. When text scales correctly:
Reading becomes significantly easier.
Buttons remain fully usable.
Layouts stay cleanly organized.
Users avoid unnecessary zooming.
In addition, supporting Dynamic Type also heavily benefits users dealing with temporary vision issues or those trying to read in bright sunlight.
8. Make Gestures Work with VoiceOver
Many modern iOS apps rely heavily on custom gestures like swiping, dragging, pinching, or long pressing. While these interactions may feel natural for sighted users, they can become incredibly difficult—or even impossible—for someone using VoiceOver.
This happens because VoiceOver uses its own specific gesture system. For instance, a swipe left or right moves between screen elements instead of performing an in-app action. Because of this, developers should never make a custom gesture the only way to complete a task.
Whenever possible, you must provide an accessible alternative:
Instead of requiring users to swipe left to delete an item, include a visible Delete button.
If users can drag items to reorder a list, offer a “Move Up” and “Move Down” option as well.
If an image can be enlarged with a pinch gesture, always include a visible Zoom In button.
By doing so, offering multiple ways to complete an action ensures everyone can use the app successfully.
9. Keep Screen Content Organized
Because VoiceOver reads content one element at a time, a cluttered or poorly organized screen will cause users to struggle to understand what belongs together. Consequently, a clean layout helps users navigate far more confidently.
Good organization typically includes:
Clear page titles
Proper headings
Related controls grouped tightly together
Logical spacing
Consistent layouts across various screens
For example, a shopping app might organize information like this:
Product Name
Price
Product Description
Available Sizes
Add to Cart
Without a doubt, this structure is much easier to understand than mixing unrelated elements throughout the screen. Furthermore, consistency matters; if the checkout button appears at the bottom of one screen, it should remain in a similar location throughout the app.
10. Test with VoiceOver Throughout Development
Unfortunately, one of the biggest mistakes teams make is waiting until the app is completely finished before testing accessibility. Instead, VoiceOver testing should be an ongoing part of the regular development process. By testing early, you can catch major problems before they become incredibly expensive to fix.
During sprints, developers should ask:
Can every single button be reached?
Does every control have a meaningful label?
Are images described correctly?
Can forms be completed without seeing the screen?
Are error messages actually announced?
Does navigation follow a logical order?
In fact, even spending just 15 to 20 minutes testing each major feature with VoiceOver can reveal critical issues that might otherwise go completely unnoticed. Therefore, accessibility testing should be included in every single release—not just major updates.
11. Listen to Feedback from Real Users
While automated accessibility tools are highly valuable, they simply cannot identify every single user experience issue. Ultimately, the people who use VoiceOver every day will notice usability problems that developers might never even consider.
For example, they might report:
Confusing or ambiguous labels
Buttons that are physically difficult to find
Navigation paths that take far too many steps
Missing audio announcements after specific actions
Forms that are incredibly frustrating to complete
For this reason, user feedback provides practical, real-world insight that automated testing can never truly replace. Whenever possible, you should:
Conduct dedicated usability testing sessions with VoiceOver users.
Closely review accessibility feedback in App Store comments.
Respond as quickly as possible to reported accessibility issues.
In conclusion, treat accessibility improvements just like any other vital feature request, because building an inclusive app is an ongoing process rather than a one-time project.
Common VoiceOver Accessibility Mistakes
Even highly experienced developers can occasionally overlook minor accessibility details. To help you avoid these pitfalls, here are some of the most common mistakes and how to fix them.
Missing Accessibility Labels: When buttons feature only icons, it often causes VoiceOver to announce generic descriptions like “Button.” To fix this, always provide descriptive labels that explain the specific action.
Duplicate Labels: When several buttons share the exact same label, users cannot tell them apart. For instance, if you have multiple buttons named “More”, change them to:
More Product Details
More Payment Options
More Shipping Information
Depending Only on Color: Crucially, color should never be the sole way to communicate information. Instead of showing errors only in red, combine color with text messages, icons, and explicit VoiceOver announcements to assist users with color blindness.
Poor Focus Management: After a popup closes or a new screen appears, the VoiceOver focus should instantly move to the most important content. If the focus jumps somewhere unexpected, users will easily become confused about where they are.
Ignoring Dynamic Type: Finally, hard-coded font sizes can make text entirely unreadable for users who increase their preferred text size. Supporting Dynamic Type allows text to scale naturally while keeping the interface perfectly usable.
How to Test VoiceOver Accessibility on an iPhone
Fortunately, testing does not require any special or expensive equipment. In fact, anyone with an iPhone or iPad can enable VoiceOver in just a few minutes.
Step 1: Turn On VoiceOver
Go directly to: Settings $\rightarrow$ Accessibility $\rightarrow$ VoiceOver and turn the feature on. Immediately, the device will begin speaking the on-screen content aloud.
Step 2: Learn Basic Gestures
Next, try out these common navigation gestures:
Swipe right to move to the very next item.
Swipe left to return to the previous item.
Double-tap to quickly activate the selected item.
Three-finger swipe to scroll through a page.
Two-finger scrub (moving your fingers back and forth like a “Z”) to go back.
By using these gestures, developers can quickly understand exactly how users experience their app.
Step 3: Navigate Every Screen
Once you are comfortable, review every major feature, including:
Login and Registration
Home screen and Search
Product pages and Settings
Shopping cart and Checkout
During this process, pay incredibly close attention to whether VoiceOver announces useful information at every single step.
Step 4: Test Different Devices
Additionally, accessibility needs to work consistently across multiple Apple devices. Therefore, make sure to test on different iPhone screen sizes, iPad models, iOS versions, and both portrait and landscape orientations to catch any layout errors.
Helpful Design Tips for Better Accessibility
It is worth noting that accessibility truly begins with thoughtful design—not just clean code. Therefore, keep these design principles in mind from day one:
Use Plain Language: Choose simple words that are easy to understand. For instance, instead of “Authenticate”, use “Sign In”. Similarly, instead of “Initiate Payment”, simply use “Pay Now”.
Create Clear Visual Hierarchy: Because important information should always stand out, make sure to use strong headings, consistent spacing, readable font sizes, and clear section breaks.
Keep Buttons Easy to Tap: Buttons should always be large enough for comfortable interaction. Specifically, Apple recommends touch targets that are easy to select without requiring incredibly precise finger movements.
Be Consistent: Navigation patterns should always remain entirely predictable. For example, keep menus in the same location, use familiar icons, and place action buttons consistently to reduce the user learning curve.
Don’t Overload Users: Finally, too much information on a single screen can completely overwhelm users. Consequently, break long content into manageable sections and present only what is strictly necessary for the current task.
The Future of VoiceOver Accessibility iOS
Looking ahead, mobile accessibility continues to improve significantly every single year. Currently, Apple regularly introduces new accessibility features and updates that make devices easier for everyone to use. As a result, developers now have more tools than ever before to build apps that work seamlessly with VoiceOver.
Furthermore, artificial intelligence is starting to play a much larger role. For example, AI-powered image recognition can now provide highly accurate descriptions for photos, while advanced speech recognition makes voice interactions smoother. Even so, developers still need to intentionally design apps that follow accessibility best practices from the very start.
Ultimately, the future of VoiceOver accessibility iOS isn’t just about adding new technology; it is about making inclusivity a completely normal part of the everyday design process.
Accessibility Benefits Everyone
Some people mistakenly believe that accessibility only helps users with permanent disabilities. In reality, however, almost everyone benefits from accessible design at some point in their lives.
For example:
Someone holding a baby may rely entirely on voice commands instead of tapping the screen.
A user outside on a sunny day may need larger text because intense glare makes the display difficult to read.
Someone recovering from a hand injury will greatly appreciate larger buttons and easier navigation.
Likewise, older adults frequently benefit from clearer layouts, better contrast, and highly readable fonts.
Therefore, when developers build with accessibility in mind, they are ultimately creating products that are easier for everyone to understand and use.
Accessibility Should Be Part of Every Release
Crucially, accessibility is not something you should check only right before publishing an app. Instead, it must be tightly woven throughout the entire development lifecycle.
A highly effective workflow includes:
Planning accessibility requirements during the initial design phase.
Writing accessible code right from the beginning.
Testing continuously with VoiceOver during active development.
Running mandatory accessibility checks before every single release.
Collecting and reviewing user feedback directly after updates.
By making accessibility a core part of every sprint, you can easily prevent small issues from snowballing into massive, expensive problems later on.
VoiceOver and Other iOS Accessibility Features
To get the best results, remember that VoiceOver works best when it is combined with Apple’s other built-in accessibility tools, such as:
Dynamic Type: Which allows users to scale text size without breaking the app’s overall layout.
Voice Control: Which lets users operate an entire iPhone using spoken commands instead of touch gestures.
Switch Control: Which supports users with limited mobility by allowing external adaptive devices to control the interface.
Display & Text Size Settings: Which lets users customize bold text, contrast, and color filters to significantly improve readability.
Ultimately, testing your app with these features alongside VoiceOver helps create a truly inclusive digital experience.
Building an Accessibility-First Culture
Importantly, creating accessible apps is not solely the responsibility of developers. Instead, the entire product team must actively participate:
| Role | Core Responsibility |
| Designers | Create layouts with accessibility in mind, choose readable fonts, and maintain proper color contrast. |
| Developers | Add accurate accessibility labels, properly support VoiceOver APIs, and test screens regularly. |
| QA Teams | Include accessibility in test plans, verify the reading order, and thoroughly check form validation. |
| Product Managers | Make accessibility a firm project requirement and allocate dedicated time for improvements. |
Consequently, when everyone contributes, accessibility naturally becomes a fundamental part of product development rather than an afterthought.
Measuring Accessibility Success
Finally, improving your app’s accessibility should always involve clear, measurable goals. To track your progress, teams can actively monitor:
The number of accessibility issues identified before a release.
The exact percentage of screens manually tested with VoiceOver.
Accessibility-related customer support tickets.
Overall user satisfaction ratings and App Store reviews.
Successful completion rates for vital tasks like registration or checkout.
In the end, these metrics help teams identify specific areas for improvement and clearly demonstrate tangible progress over time.
Conclusion
In conclusion, building an accessible mobile app is not just about meeting a list of strict legal guidelines—it is fundamentally about creating a significantly better experience for every single user. By supporting VoiceOver accessibility iOS, you allow people who are blind or have low vision to navigate your application independently and confidently.
Ultimately, simple improvements like descriptive labels, logical navigation, Dynamic Type support, and regular manual testing can make a massive world of difference. While accessibility undeniably requires ongoing attention, the long-term rewards are substantial: happier users, stronger customer trust, a broader audience reach, and an all-around higher-quality product.
Frequently Asked Questions (FAQ)
What is VoiceOver on iOS?
VoiceOver is Apple’s built-in screen reader for iPhone and iPad. It speaks aloud on-screen content so users who are blind or have low vision can navigate apps using touch gestures and audio feedback.
Why is voiceover accessibility iOS important?
Because it ensures that people with visual impairments can independently use mobile apps. In addition, good VoiceOver support improves overall usability, customer satisfaction, and compliance with international standards.
Does VoiceOver work in every iPhone app?
VoiceOver is available system-wide; however, its effectiveness depends entirely on how well developers build accessibility into their specific apps. Apps with missing labels can be incredibly difficult to use.
How do I turn on VoiceOver?
Simply go to Settings $\rightarrow$ Accessibility $\rightarrow$ VoiceOver and toggle it on. Alternatively, you can just ask Siri to “Turn on VoiceOver.”
What are accessibility labels?
They are descriptive names assigned to interface elements like buttons and images. As a result, VoiceOver can read these labels aloud so users know exactly what each element does.
Should decorative images have accessibility labels?
No. Decorative images that do not provide useful information should be hidden from VoiceOver so users are not distracted by unnecessary announcements.
How often should developers test accessibility?
Accessibility should be tested continuously throughout development and right before every single app release to keep the user experience consistent.
Can automated testing completely replace manual VoiceOver testing?
No. While automated tools can identify technical issues, they cannot evaluate the actual user experience. Therefore, manual testing and real user feedback remain absolutely essential for mastering VoiceOver accessibility iOS.
References
Apple Developer. Supporting VoiceOver in Your App. https://developer.apple.com/documentation/uikit/supporting-voiceover-in-your-app
Apple Developer. Accessibility. https://developer.apple.com/accessibility/
Apple Developer. Human Interface Guidelines: Accessibility. https://developer.apple.com/design/human-interface-guidelines/accessibility
W3C Web Accessibility Initiative (WAI). Mobile Accessibility Overview. https://www.w3.org/WAI/mobile/
The A11Y Project. Accessibility Resources. https://www.a11yproject.com/
WebAIM. Accessibility Articles and Research. https://webaim.org/blog/